How to Configure Cron Jobs in cPanel
Cron jobs are scheduled tasks that allow you to run commands or scripts automatically at specific intervals. These tasks can be useful for automating processes such as website backups, sending newsletters, cleaning up databases, or updating site data regularly without manual intervention. In cPanel, setting up cron jobs is simplified, making it accessible even if you're not a developer.
Configuring Cron Jobs in cPanel:
Step 1: Log into cPanel
Access Your cPanel Account:
- Open your web browser and go to your hosting provider’s website.
- Log in to your cPanel account using your credentials.
Locate the Cron Jobs Tool:
- Once logged in, navigate to the Advanced section of your cPanel dashboard.
- Click on the Cron Jobs icon. This will open the Cron Jobs management page, where you can add, edit, and delete cron jobs.
Step 2: Set Up Email Notifications (Optional)
- Why Set Up Notifications?
- Cron jobs usually run in the background, so it can be hard to tell if they've completed successfully. Setting up email notifications allows you to receive an email whenever the cron job runs, letting you track its progress or diagnose issues.
- How to Set It Up:
- At the top of the Cron Jobs page, there’s a section for Email Notifications.
- Enter the email address where you want to receive these notifications, then click Update Email.
- Note: If you don't want to receive an email every time the cron job runs, add the following at the end of your command:

This will suppress any output from the cron job unless there’s an error.
Step 3: Define the Command
- What Is a Cron Command?
- A cron command tells the server what action to perform at the scheduled time. This can be anything from running a PHP script, a backup script, or any other command-line operation.
- How to Enter the Command:
- In the Command field, specify the path to the script or file you want to run. Make sure the path is accurate.
- Examples:
- To run a PHP script:
![]()
Replace username with your cPanel username and your_script.php with the actual script file you want to run.
-
To run a shell script:

Testing Your Command:
- Before scheduling the job, it’s a good idea to test the command manually via the terminal to ensure it works as expected.
Step 4: Schedule the Cron Job
-
Understanding the Schedule:
- A cron job’s schedule determines how often the command will run. You can set it to run at very specific times or recurring intervals like every minute, hour, day, or week.
-
Common Settings:
- cPanel offers predefined options for common cron schedules. Select one from the Common Settings dropdown if it matches your needs.
Predefined Options Include:
- Every Minute
- Once an Hour
- Once a Day
- Once a Week
- Once a Month
-
Manual Scheduling (Advanced Users):
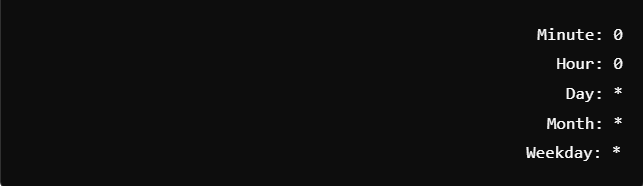
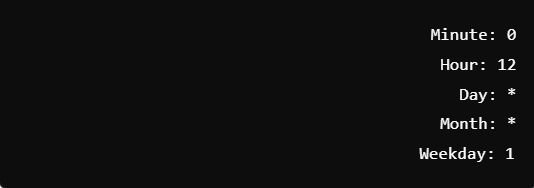
- If you want to set a custom schedule, you can use the following five fields to define the timing of your cron job:
- Minute (0-59): The minute of the hour you want the job to run (e.g., 0 for exactly on the hour).
- Hour (0-23): The hour of the day (in 24-hour format).
- Day of Month (1-31): The specific day of the month (e.g., 15 for the 15th day).
- Month (1-12): The month of the year.
- Day of Week (0-7, where 0 or 7 is Sunday).
Examples of Custom Scheduling:
- Run a script every day at midnight:
- If you want to set a custom schedule, you can use the following five fields to define the timing of your cron job:
- Run a script every Monday at noon:
Step 5: Add the Cron Job
- Once you have entered the command and configured the schedule, click Add New Cron Job to activate it.
- Your cron job will now be listed under Current Cron Jobs at the bottom of the page.
Managing and Editing Cron Jobs:
-
View Active Cron Jobs:
- After adding a cron job, you can see a list of all active cron jobs at the bottom of the Cron Jobs page.
-
Editing or Deleting a Cron Job:
- To modify the schedule or command, click Edit next to the job you want to change.
- To remove a cron job, click Delete.
-
Testing and Debugging:
- It’s always good practice to test your cron job manually before relying on it. You can run the command directly in the terminal if you have SSH access.
- Check the email notifications (if enabled) to see any error messages or outputs from your cron job. This can help identify if something went wrong during execution.
Tips and Best Practices:
-
Avoid Overloading the Server:
- Scheduling cron jobs too frequently (e.g., every minute) can place unnecessary load on your server, especially if the task is resource-intensive.
- If a job doesn’t need to run frequently, space it out appropriately to balance server performance.
-
Logging Cron Job Output:
- You can create a log file for your cron job by adding the following to the end of your command:

This will save the output to a file called cron.log in your home directory, allowing you to review it later.
-
Check Server Timezone:
- Make sure your server's timezone is correctly configured, especially if your cron jobs are time-sensitive.
Congratulations! You’ve just mastered the art of configuring cron jobs in cPanel! By automating these tasks, you’re not only boosting the efficiency of your website but also freeing up valuable time for yourself. If you ever have questions or need a helping hand, don’t hesitate to reach out. We’re here to support you!


