How to Add a Custom Menu in WordPress
Adding a custom menu in WordPress is a great way to improve the navigation of your website. This guide will walk you through the steps to create and manage custom menus.
Step 1: Log into Your WordPress Dashboard
Step 2: Access the Menus Section
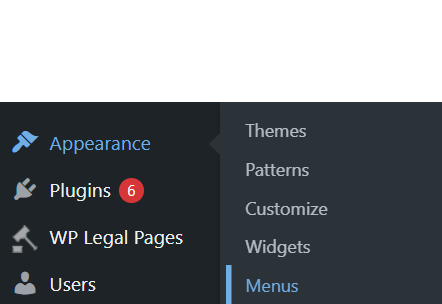
- In the left-hand menu, hover over Appearance and click on Menus.
Step 3: Create a New Menu
- In the Menus section, click on the Create a New Menu link.
- Enter a name for your new menu (this name is for your reference and won’t appear on the site).
- Click the Create Menu button.

Step 4: Add Items to Your Menu
- On the left-hand side, you will see options like Pages, Posts, Custom Links, and Categories.
- Pages: Add specific pages from your site (like Home, About, Contact).
- Posts: Add specific blog posts.
- Custom Links: Add a link to an external site or a specific URL.
- Categories: Add categories to display posts in specific sections.
- Select the items you want to add to your menu by checking the boxes next to them and clicking the Add to Menu button.
Step 5: Arrange Menu Items
- After adding the items, you can reorder them by dragging and dropping them into the desired position.
- You can create submenus (dropdowns) by dragging an item slightly to the right under a parent item.
Step 6: Assign the Menu Location
- In the Menu Settings section, you will see options to assign the menu to various locations such as:
- Primary Menu: The main navigation menu.
- Footer Menu: A menu in the footer of the site.
- Check the box for the location where you want to display the menu.
Step 7: Save the Menu
Once you’ve arranged your items and selected a location, click the Save Menu button.
Step 8: Preview the Menu
Visit your website to ensure the custom menu is displaying correctly. If needed, you can return to the Menus section and make further adjustments.


